
True Potential of Picobrew = ChiefWigms Server + RaspberryPi
Instructions and commentary for setting up the Chiefwigms server on a RaspberryPi. Pairs perfectly with PicoFree you have the Bring Your Own Ingredients.


If you have been holding off out on setting up the local server that a number of the community engineers are contributing to it (4+ now with many more users reporting small bugs or improvements)... you are simply missing out. With this small amount of work (really it isn't scary or complex as you make it out to be) along with Jonathan's PicoFree boxes you can essentially turn your PicoBrew C/S/Pro devices into a "mini Z" by unlocking a reusable PicoPak replacement to truly offer "Bring Your Own Ingredients" to your brewing game (more on this and recipe development in a future blog post).
The underlying server implementation, chiefwigms/picobrew_pico, is a truly platform independent python+flask based web server that has built in support for the following Picobrew (and other) devices. Each one of these devices requires a remote (not embedded) server to function relying on both pulling recipe/machine instructions while also relaying collected data and metrics (ie brew and fermentation graphs) to this server. If and when picobrew.com goes dark (message from "new owners") these machines with all else equal will become large electronic paper weights and thus this initiative and drive to unlock and untether yourself now with great urgency:
- Pico C (technically same functionality as S/Pro, but with different firmware)
- Pico S/Pro
- Zymatic (Zy for short, or "original Pico" from Kickstarter)
- Z Series (Z for short)
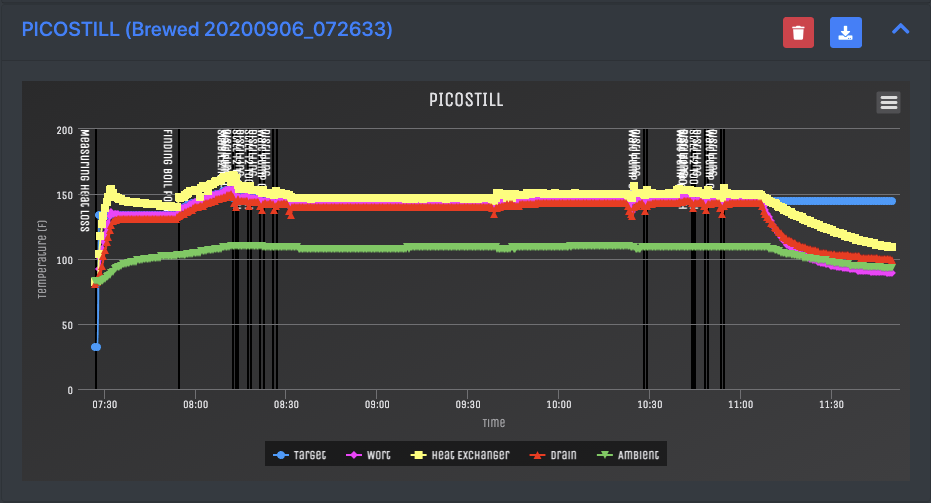
- PicoStill
- PicoFerm
- iSpindle (not from Picobrew, but widely used)
The below is an example wire diagram of what it happening at the network layer here. We have pre-configured the RaspberryPi's operating system to wirelessly connect to your home router while also creating a WiFi Access Point (WLAN - Wireless LAN) and internal network itself tied together with the ethernet port or LAN (Local Area Network).
DO NOT CONNECT your RaspberryPi DIRECTLY TO YOUR HOME NETWORK with any included ethernet ports. This will not work as you intend and could pollute your network with an invalid IP address space.
If you require a hardline for the RaspberryPi due to your brewing setup (garage, basement, etc) that is out of range of your main home network, please let me know. However, even if the RaspberryPi doesn't have a connection to your home network there is only a few features (self updating, importing instructions/recipes, and remote monitoring) that are impacted here and you can still have a fully automated brew day ahead of your no problems.
                                                    +- ZSeries ----+
                                              +-----+ 192.168.72.2 |
                                              |     +--------------+
                          +- RPi -------+     |
                      +---+ 10.10.0.2   |     |     +- ZSeries ----+
                      |   |     WLAN AP +-))) | (((-+ WLAN Client  |
                      |   |             +-LAN-+     | 192.168.72.3 |
                      |   | 192.168.72.1 |          +--------------+
                      |   +-------------+
 +- Router ----+      |                             +- PicoFerm ---+
 | Firewall    |      |   +- PC#2 ------+       (((-+ WLAN Client  |
-+ DHCP server +-WLAN-+---+ 10.10.0.3   |           | 192.168.72.4 |
 |   10.10.0.1 |      |   +-------------+           +--------------+
 +-------------+      |
                      |   +- Mobile#1 --+           +- PicoFerm ---+
                      +---+ 10.10.0.4   |       (((-+ WLAN Client  |
                          +-------------+           | 192.168.72.5 |
                                                    +--------------+
Required Parts
- RaspberryPi (any model should work, just like a windows/mac/linux also works with the underlying server... truely a platform independent solution)
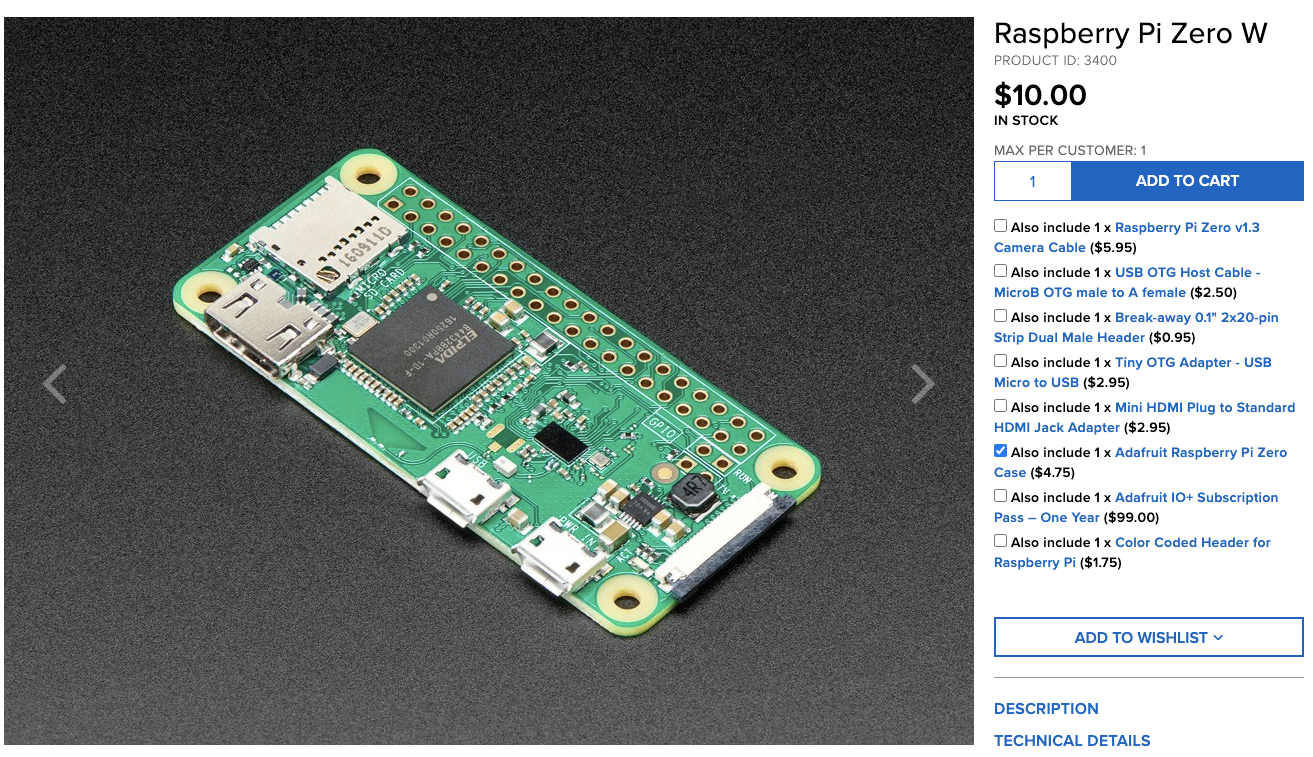
a) (recommended for Pico C/S/Pro units) -> RaspberryPi Zero W (starting price $10)
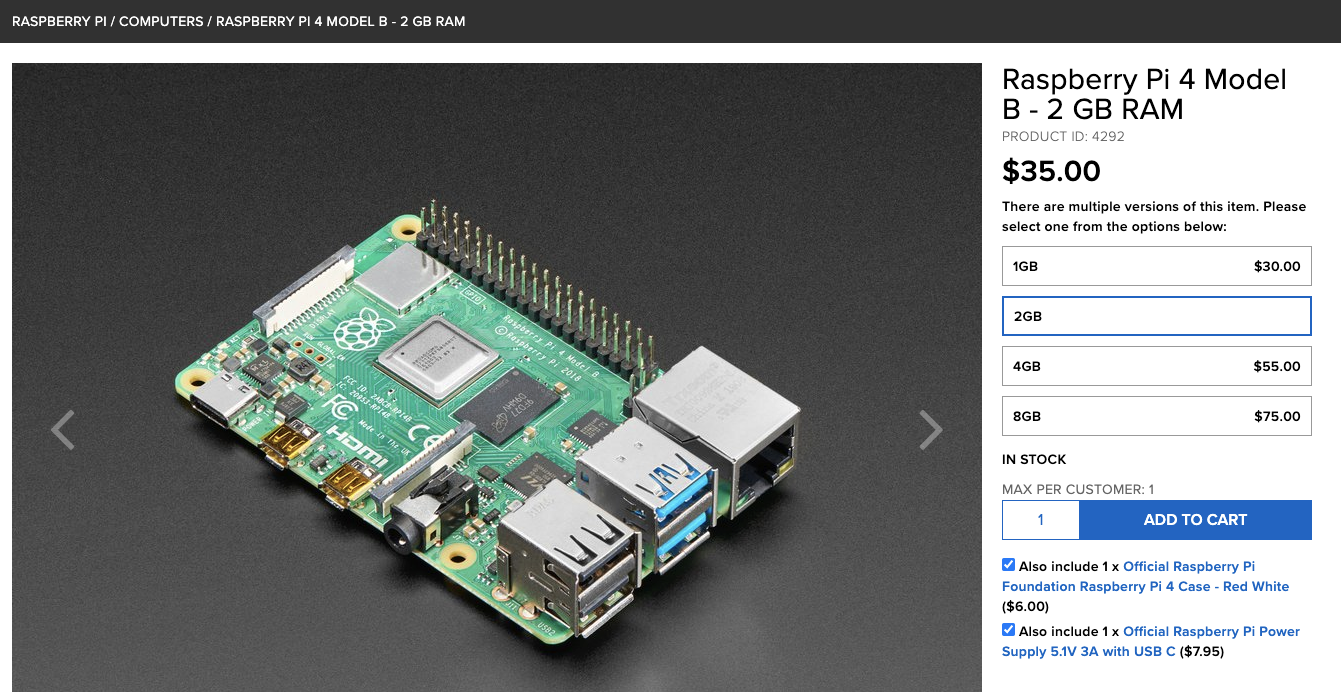
b) (recommended for Pico Z units) -> RaspberryPi 4 Model B (starting price $35) - Compatible SD Card (8GB is good, but any size larger than 4GB should work; pay close attention to the SD card type: mini, micro, etc). Raspberry Pi themselves recommend no smaller than a 4GB for a
lite(non graphical) interface, and 8GB+ for any other build. Given this is a custom image and we use the file system for brew session data no smaller than 8GB is recommended, larger is preferred. - Compatible Power Supply (likely you have an extra phone or small electronic charger laying around that isn't used... these are perfect)
- (optional - highly recommended) Compatible Case - not technically needed, but is nice to make the RaspberryPi appear complete and protects the internals. In theory one could mount within your Picobrew if you really want to get serious about it... I'm not providing instructions on that at this time though.
- (optional if you don't have a SD slot / reader already) USB SD Card Adapter - if you don't have a docking station, or an included SD card slot on your computer you will need to pick up a compatible USB microSD or SD Card Adapter (USB-C or USB-A or as I prefer both in one convenient adapter)
Yes kits like the following work just fine... though be aware that if the kit is $70+ it probably includes things you definitely don't need: fans, metal cases, heat sinks... avoid these terms like the plague as they are only complicating things for you and unless you plan to run a full game emulator or video streaming service on a RaspberryPi are likely overkill just to fool folks into shelling out more cash.
For the Raspberry Pi Zero W with a case, power supply and microSD card you are aiming for ~$30-$40 all in.
For the Raspberry Pi 4 Model B with a case, power supply and microSD card you are aiming for $55-75 all in. Be aware that there are multiple "RAM" options for the Raspberry Pi 4 board... 1GB, 2GB, 4GB, and 8GB prices range from $34 upwards to $75 just for the board. Anything above 2GB is overkill for us here, but are more flexible for other "projects" you or others might want to do with this general computer (desktop replacement, home mesh router, local media server, robotics, etc). Please stick with the 2GB model that is likely sold out on many online retailers... due to demand surges and shortage of supply due to a global supply chain issue (I could talk hours and hours on that topic alone... actually wrote a paper in college related to this).
(shipping my be extra depending on retailer and their treatment of their warehouse and delivery teams)
Buy These

Definitely Not These
Initial Setup
Step #1: Download Bootable Image from Github
Yeah I get that you don't use Github on a daily basis like some of us engineers in the group... so I'll try and make this super simple for you and break down into individual steps.
Step #1a: Go here. https://github.com/chiefwigms/picobrew_pico/releases
Step #1b: See the latest release... (it is on the top)
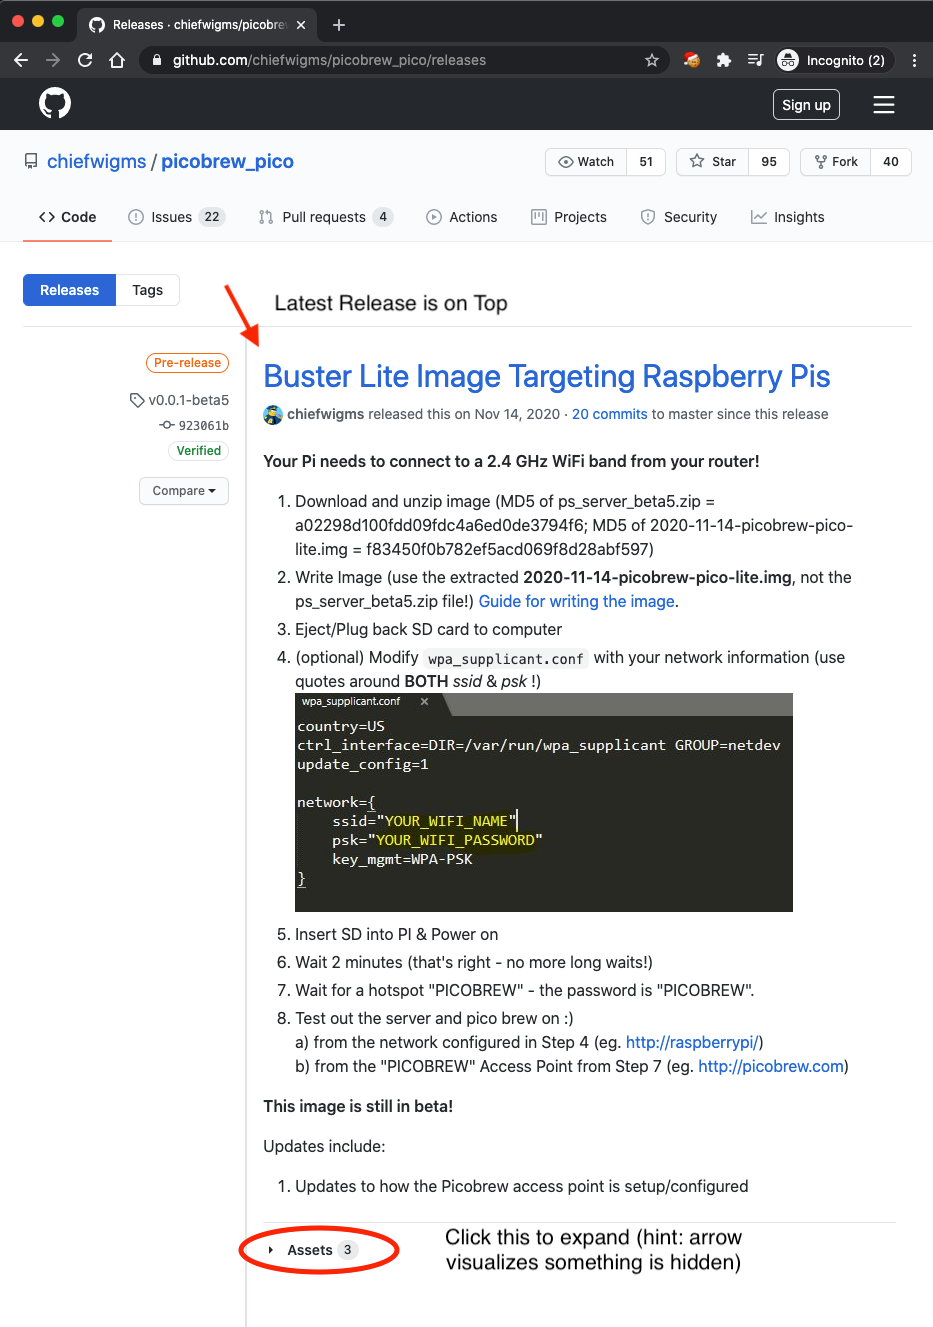
Step #1c: Expand/Click-on the "Assets" Section (HINT: designers and engineers use small symbols to relay information... this arrow / chevron is to convey that there is additional information hidden or "collapsed")
Step #1d: Follow Step 1 as written in Github... and download and unzip the provided file ps_server_beta5.zip (beta5 was latest release at the time of this writing).
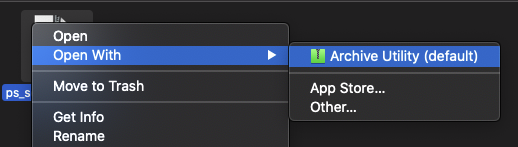
On MacOS I've included a screenshot (since so many ask...) this is how you can "expand" or "unzip" a ZIP file like ps_server_beta5.zip. Since this is the default program you could also just double click it as well to "open in default program".
Now instead of the 581.4MB file we had before named ps_server_beta5.zip we have a 2.17GB file named 2020-11-14-picobrew-pico-lite.img. This is a "bootable image" that we will be "flashing" to our SD card to be used as the bootable Operating System of our Raspberry Pi. The Operating System we have been basing this image off of is Raspbian and specifically we are using a lite version which doesn't include a graphical interface / desktop interface so if you have a monitor you will just see a terminal (black screen with colored text) that you can type or interact with the underlying OS or filesystem from (more on this later).
Additionally in Github we have listed the MD5 (Message Digest 5th Series, wikipedia) which is essentially the "thumbprint" of the file. These strings can be used to verify that the files we (the authors and maintainers) uploaded to Github is the EXACT same files you have downloaded from Github. If these fingerprints are indeed identical this means the file wasn't tampered with nor corrupted upon downloading. This is important to do for security and trust reasons. Outside of this these values aren't needed for anything else. Below are example terminal/command-line instructions and output for running this on MacOS (similar commands or functions exist for Windows... Google is your friend if you are uncertain about something).
md5 ~/Downloads/ps_server_beta5.zip
MD5 (/Users/tmack/Downloads/ps_server_beta5.zip) = a02298d100fdd09fdc4a6ed0de3794f6
md5 ~/Downloads/2020-11-14-picobrew-pico-lite.img
MD5 (/Users/tmack/Downloads/2020-11-14-picobrew-pico-lite.img) = f83450f0b782ef5acd069f8d28abf597Step #2: Write Extracted Image File to SD Card
All the instructions on how to do this are in the provided link on our Github Releases page...
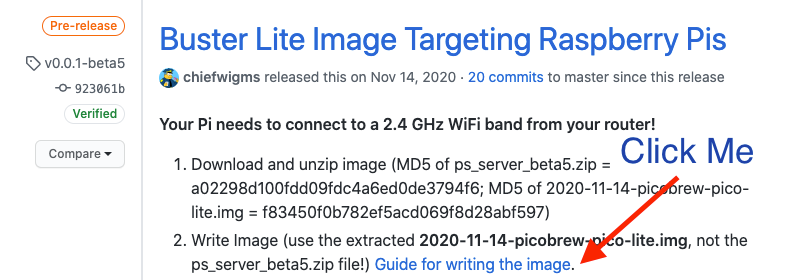
Again here are more specific handholding instructions... though REALLY GO READ THIS LINK NOW... https://www.raspberrypi.org/documentation/installation/installing-images/
Step #2a: Read https://www.raspberrypi.org/documentation/installation/installing-images/
Step #2b: Choose and install program to use to write to the SD Card... Link suggests using Raspberry Pi Imager (download link) which is built and developed by the Raspberry Pi Organization itself... do that. (or like me use Etcher instead)
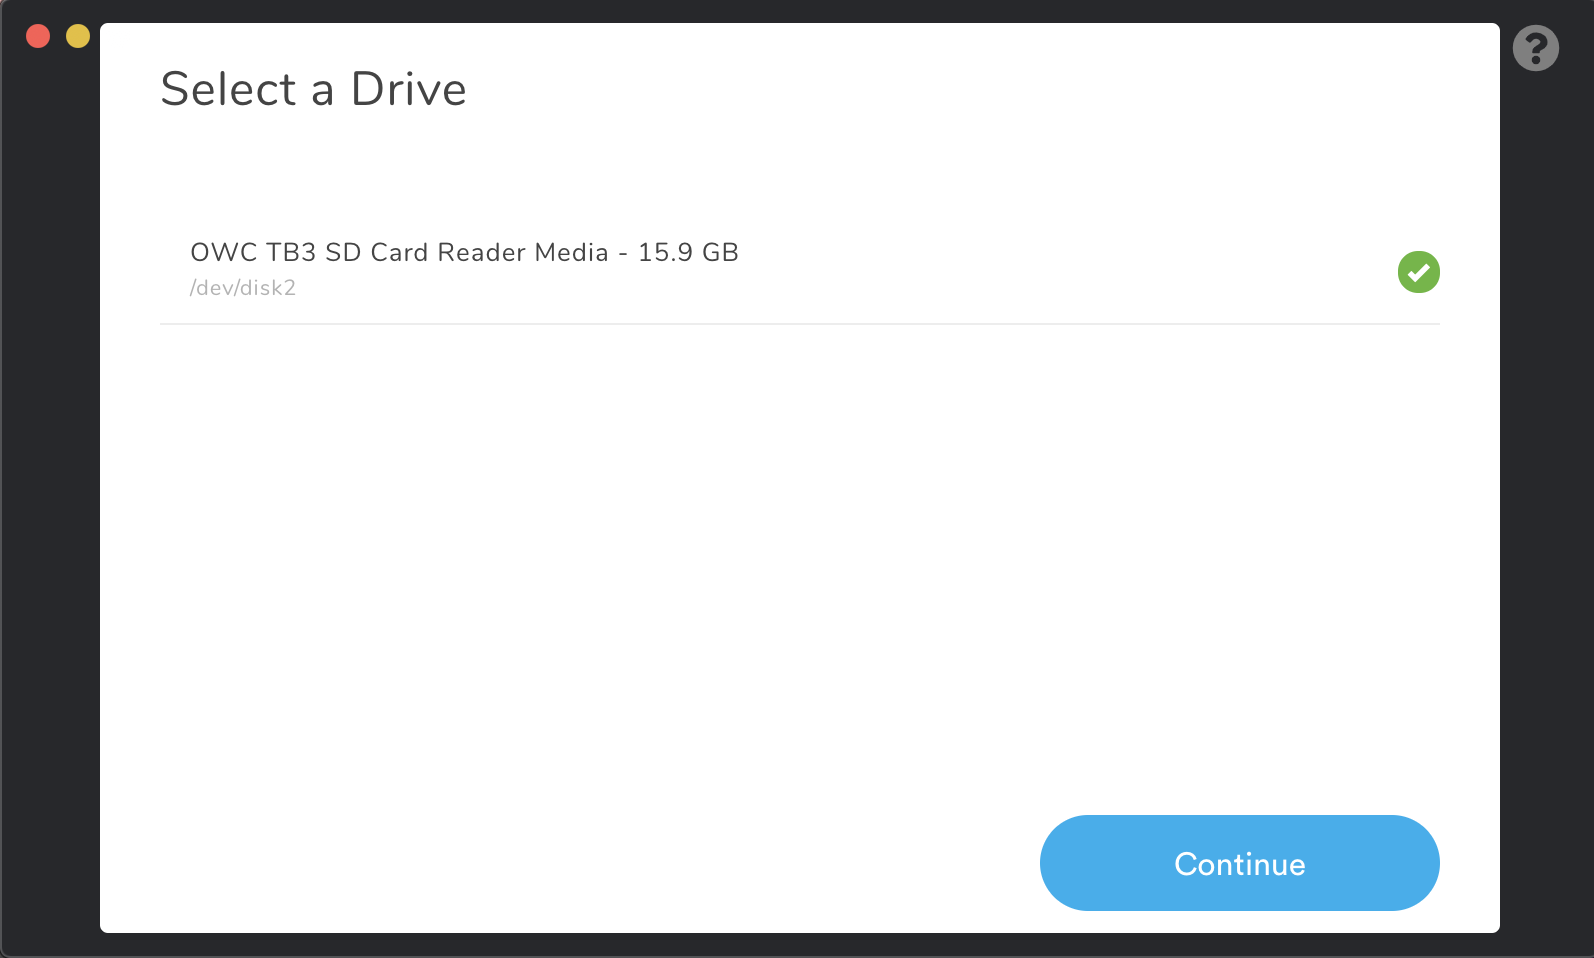
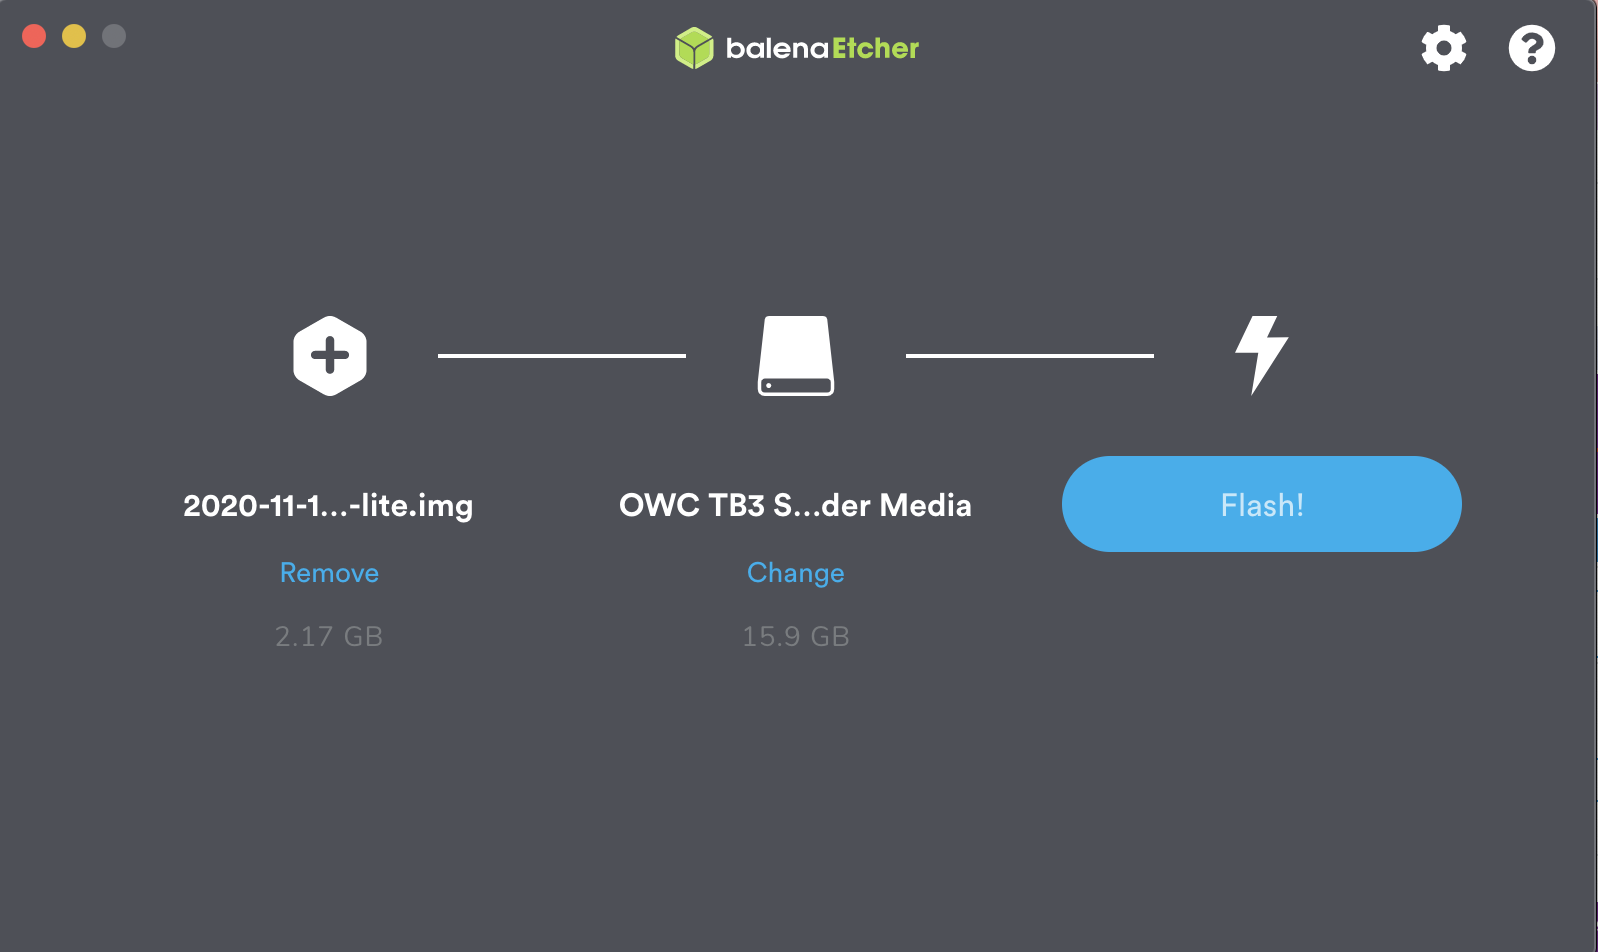
Step #2c: Select Image... Select Drive... Flash!

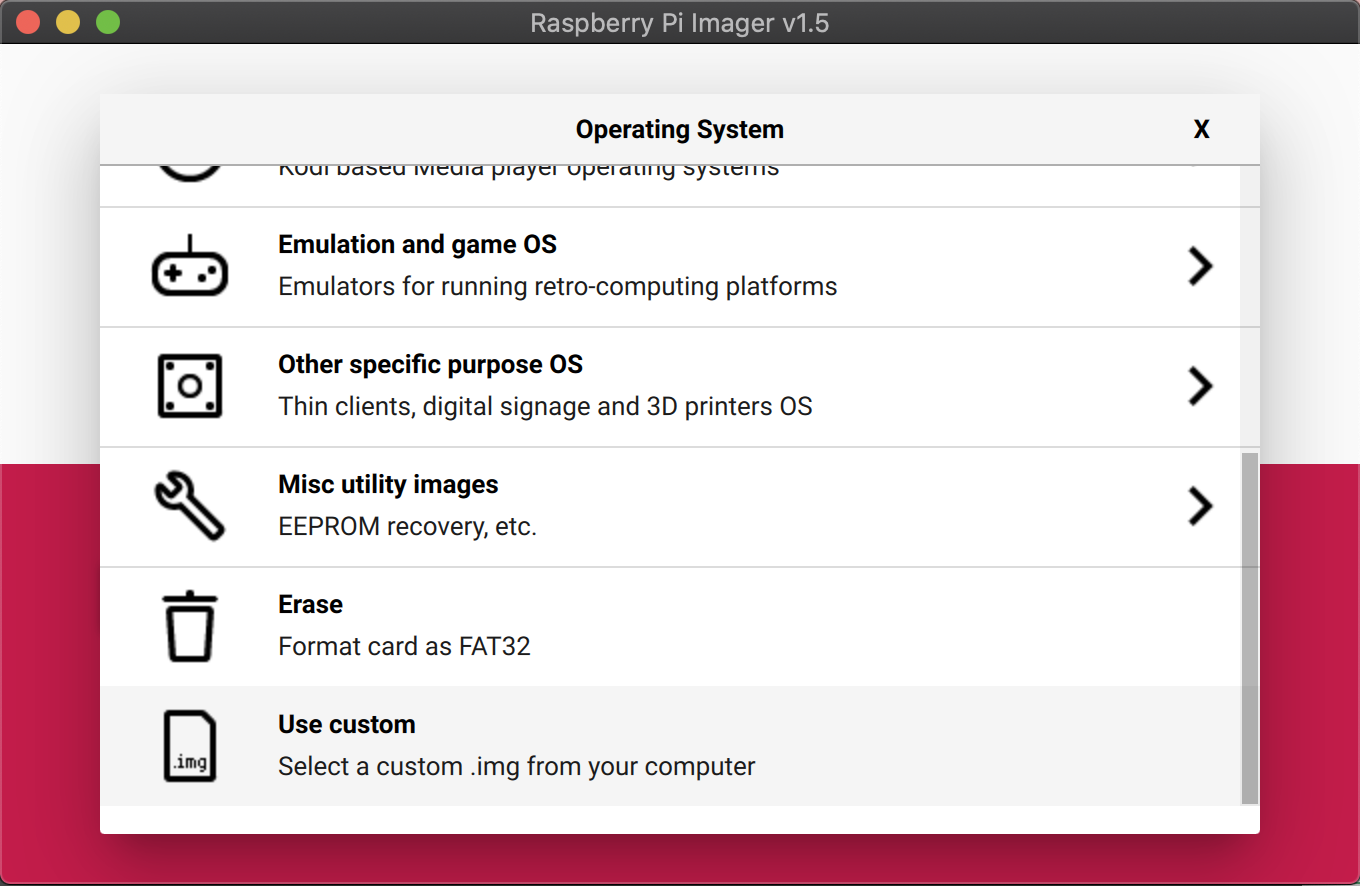
If using Raspberry Pi Imager select the operating system (aka the image we downloaded prior) first by selecting Use custom (last option) when you are prompted for the image. You aren't installing Raspbian directly... but rather using a custom operating system built on top of it.
You may be asked to allow Raspberry Pi Imager to have access to your file system. Grant this since you want to select a file from your file system.
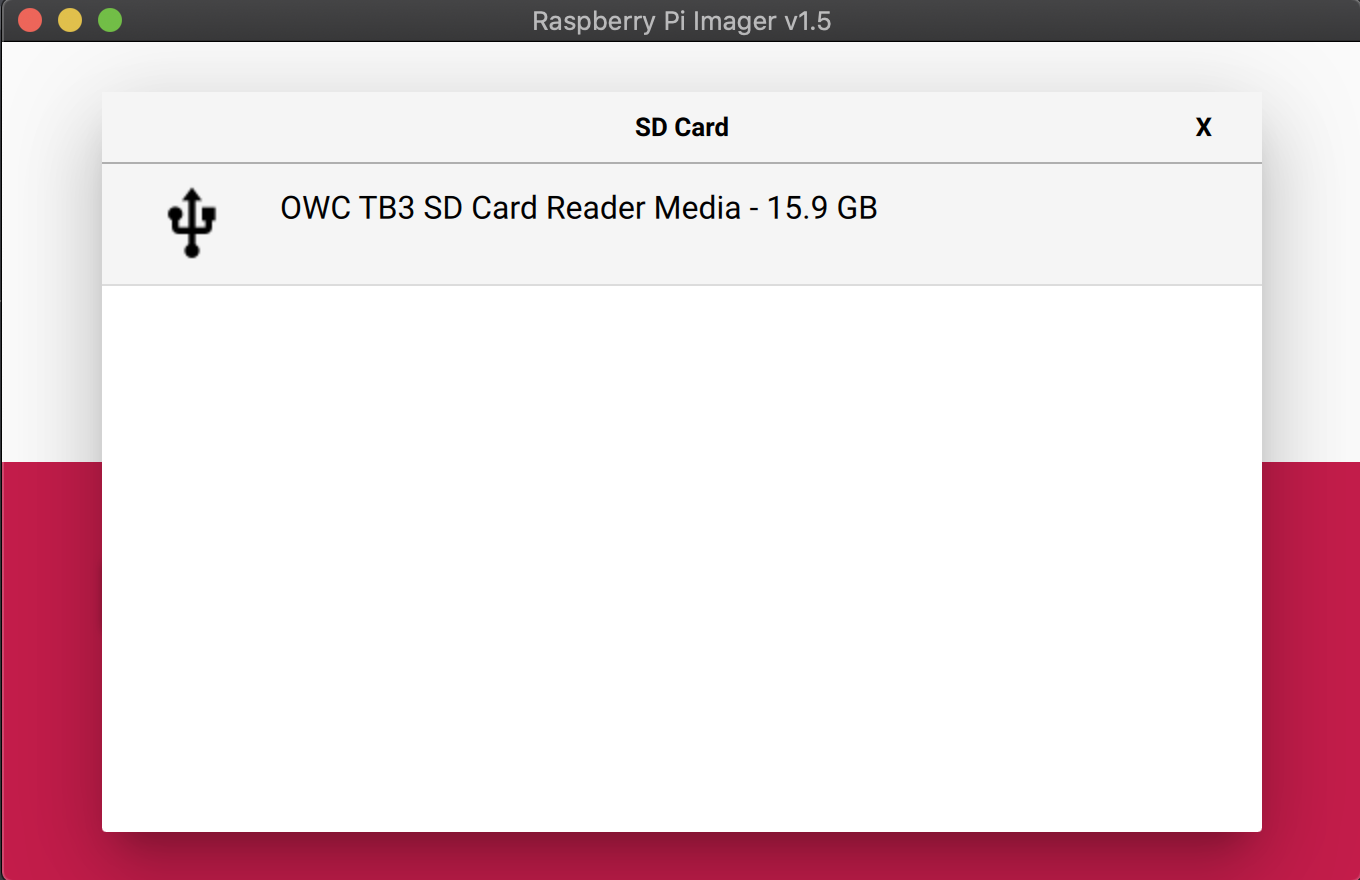
Select the drive... the SD card when inserted into your computer will be a removable drive just like a "thumb drive".
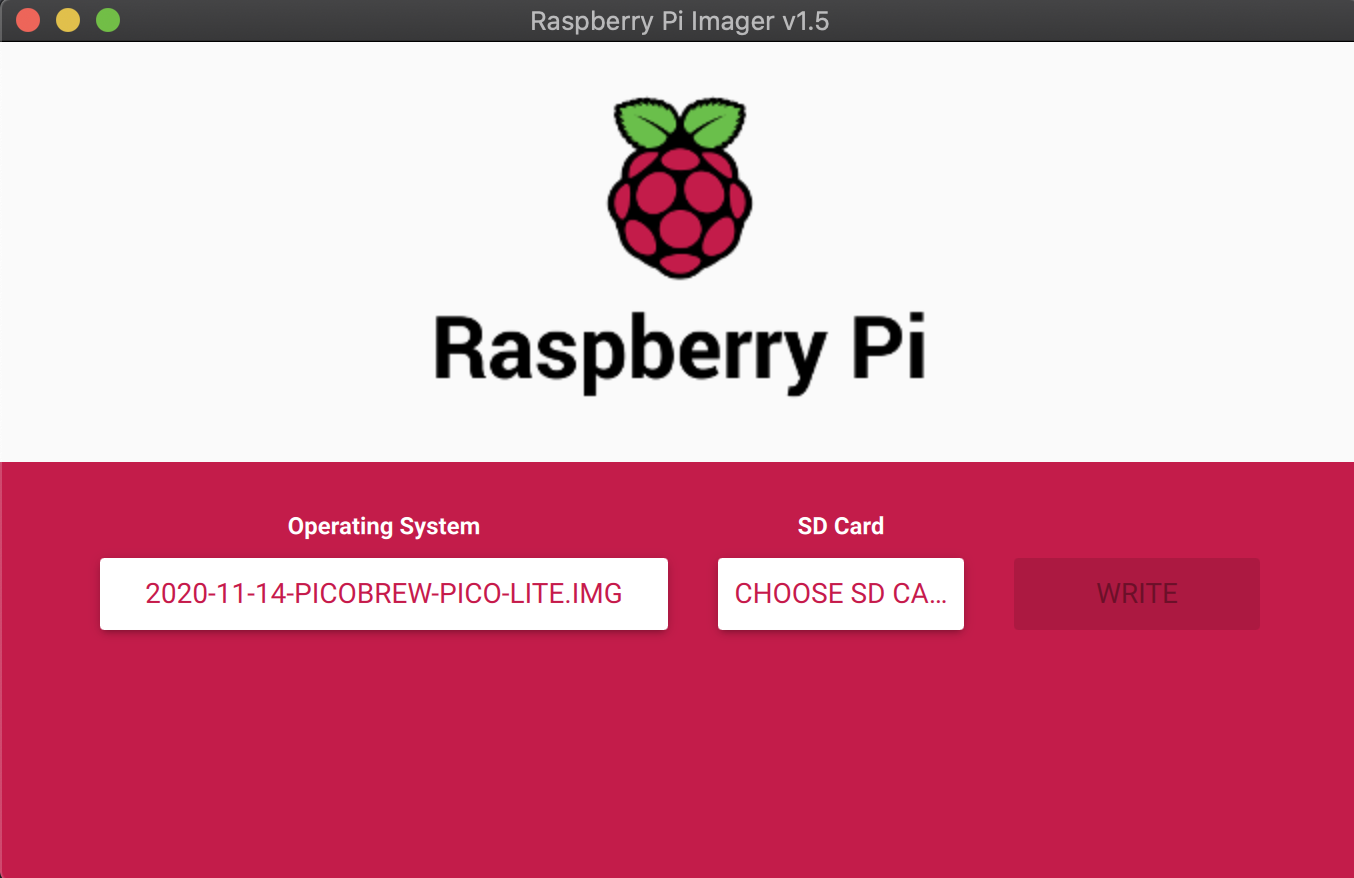
Now... yup only one thing to do... Write!
Or if using Etcher... select Flash from file
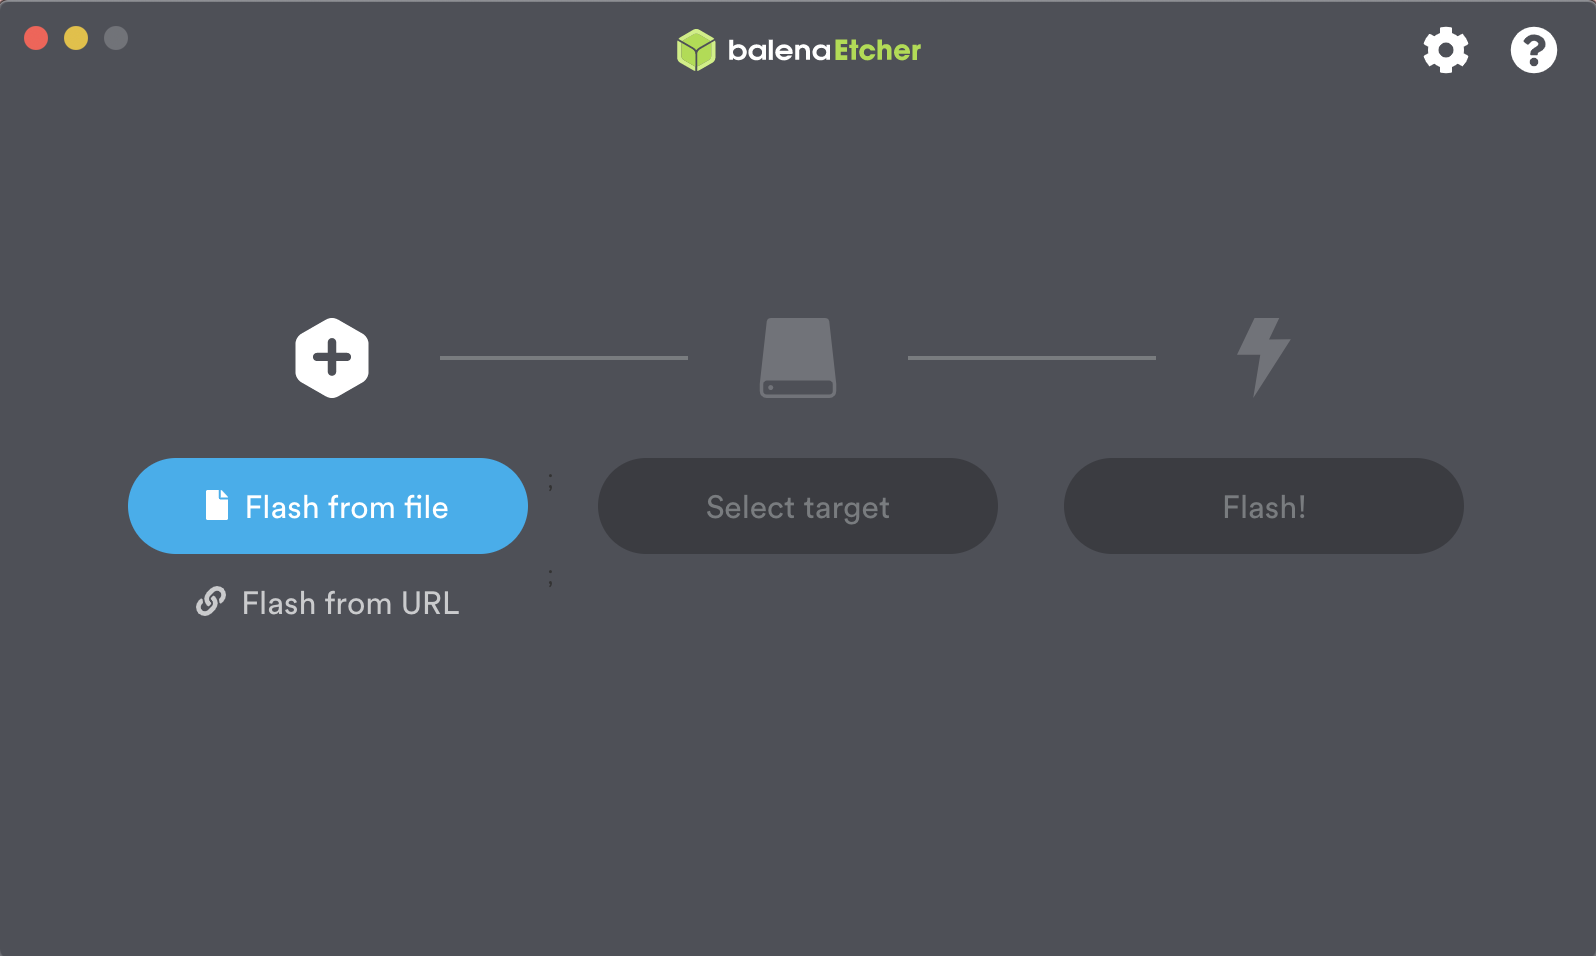
Select the drive... the SD card when inserted into your computer will be a removable drive just like a "thumb drive".
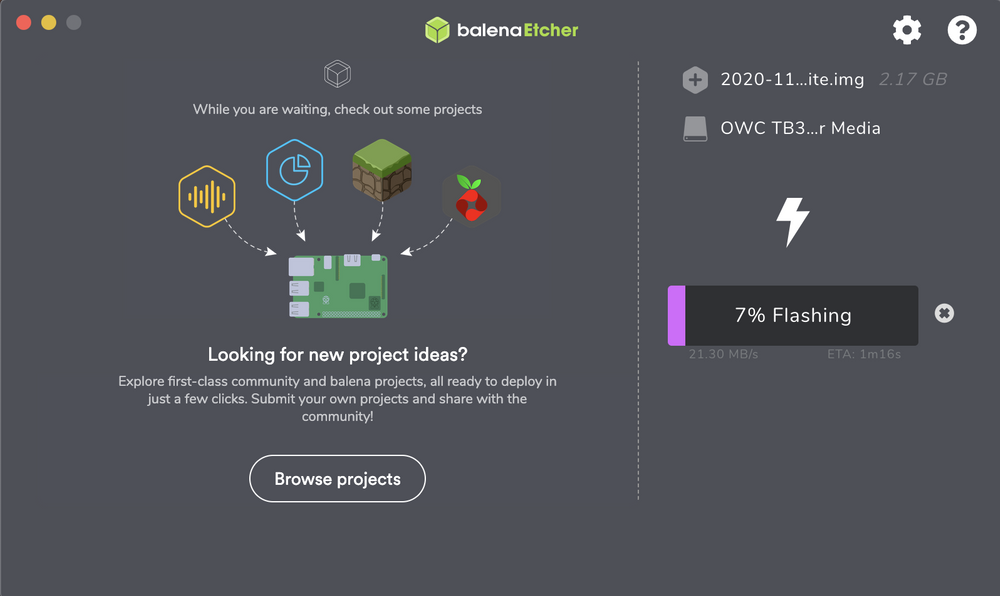
Now... yup only one thing to do... Flash!
Depending on your operating system and your security settings you may be prompted to enter your administrator password at this point in time.
Yay we are done! (with Step #2)

Step #3: Eject/Plug back SD card to computer
... not much to say here. Though this step is only needed if continuing to Step #4 otherwise skip and go to Step #5.
Some flashing software (like Etcher) will eject upon completion, but make sure you don't see the SD card mount that you flashed to in Step #2 above still mounted before removing the SD card from the system and reinserting it.
Step #4: Modify wpa_supplicant.conf with your network information (use quotes around BOTH ssid & psk !)
This is technically an optional step. The server is completely usable upon completion of Step #2 (continuing to Step #5) if you don't want to have network access to the Brew House replacement (UI of the Raspberry Pi) from other devices on your home network (but why would you want that) or don't want to have self updating server software (yeah... I can understand not liking things updating automatically, but come on)
With the introduction of beta6 (To Be Announced) you will have complete ability to setup WiFi post initial startup. There was a repacking error in beta5 that breaks the ability to setup configuration the initial WiFi post initial boot sequence (bundled server software isn't compatible with the OS packaging of said software). This has since been resolved and just not re-bundled in a new release (stay tuned to Picobrewers or Github for that later).
If you intend to setup WiFi network credentials at this time please continue. NOTE: You need to connect a 2.4 GHz only network or otherwise pin the RaspberryPi to this band (as depending on the model your RaspberryPi supports 2.4 and 5.0 Ghz, whereas the Pico machines don't support 5.0 Ghz).
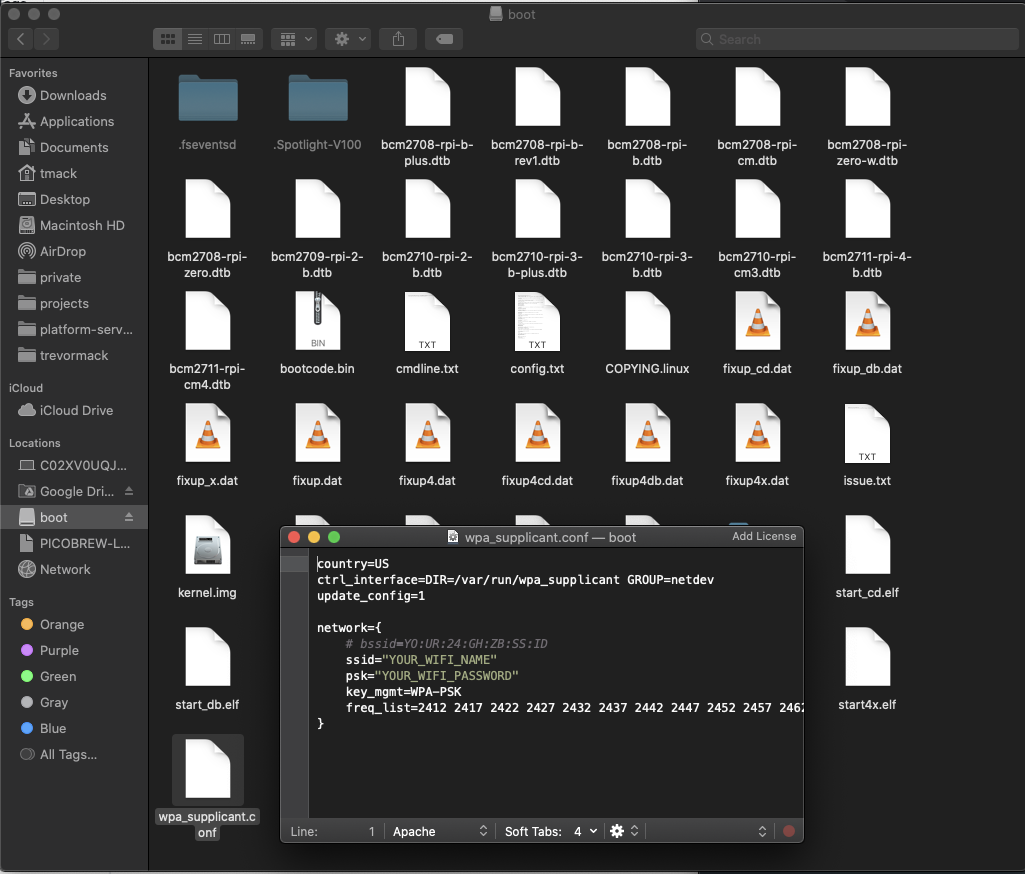
After re-inserting the SD card you should be able to see a file system like the one displayed below. Last file on this mounted system is wpa_supplicant.conf (if ordered by title) this is the file we are interested in modifying at this time. If you do not see this file then you may have inserted the prepared SD card into your RaspberryPi... if you have done this this file would have been moved and relocated on the bootable filesystem, but the raw filesystem and thus go back and restart at Step #2.
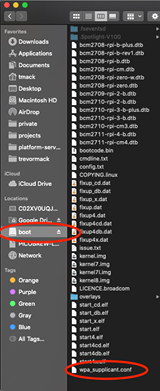
Once you find the wpa_supplicant.conf file open it in a basic text editor (not a rich text editor... aka do not use Word Perfect, Libre, Pages, Microsoft Word or the like). Basic editors come on all OS types: TextEdit (MacOS), NotePad (Windows), etc. Though if you explicitly have downloaded and configured another such program go and use that as well.
This file is a standard wireless configuration file for use on *nix / Unix-like based Operating Systems (linux, unix, etc). We have chosen to have a very simple file structure that meets 90% or more people that will interact with this source. If you have a more complex / secure network (ie. not using WPA-PSK) then by all means change this configuration as needed there are plenty of sources on the internet (ie. google) that will help you get this setup for you.
You may encounter an error when you go to save this file... this is likely ok. To check close the file while copying the contents and reopen it to verify everything is intact.

There are 3 lines that you may be interested in for modification:
- SSID (ie. Network Broadcast Name) - replace
YOUR_WIFI_NAME(leave the quotes intact) with your network's name if one is broadcasted - PSK / Pre-shared Key (ie. Network Password) - replace
YOU_WIFI_PASSWORD(leave the quotes intact) with your network password - (optionalish) BSSID (ie. Mac Address of a Wireless Access Point)
The 3rd line above above is super important for a subset of network setups (especially those using Comcast's provided routers apparently). On various network setups you can't separate the broadcasted 2.4Ghz and 5.0Ghz networks, but thankfully these networks are made up of 1 or more signals being broadcast locally (each frequency from its own physical network card / interface). Finding the physical address (ie. MAC address) of the 2.4Ghz frequency that is strongest in the area your Pi will be setup in is best to prevent any router side frequency switching / traffic management algorithms to switch from the 2.4Ghz network to a more "optimized" (for the Pi, but not for downstream devices). This is important since all RaspberryPi models today have a single wireless interface and thus can only operate on one frequency at a time, but some have support for either frequency.
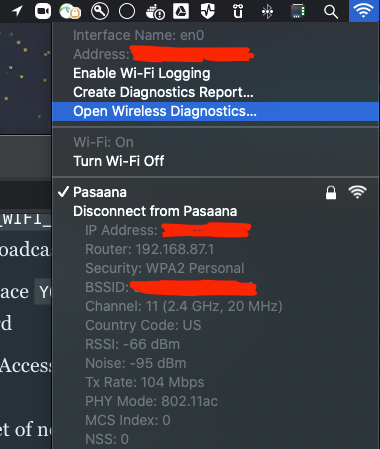
If you have MacOS there is a simple command line utility airport or a utility software Wireless Diagnostics which has a wireless network scanner (using airport). These are internally by the OS when you go to connect to a wireless network. You can read a bunch about how to create a symbolic link for the command line tool or the UI driven solution from these sources.
Easiest way to get this information on MacOs is to Option+Click on the WiFi menu and choose to Open Wireless Diagnostics which if the network you want to configure is already selected and connected on your main computer... the BSSID listed may be for the 5.0Ghz network and not 2.4Ghz specifically (check the channel frequency to be sure, the image shared below has Channel: 11 (2.4Ghz, 20Mhz) which is a 2.4Ghz channel). My specific MAC addresses are redacted for the security of my network (please never share these online... treat them with the same regard as you should a password!).
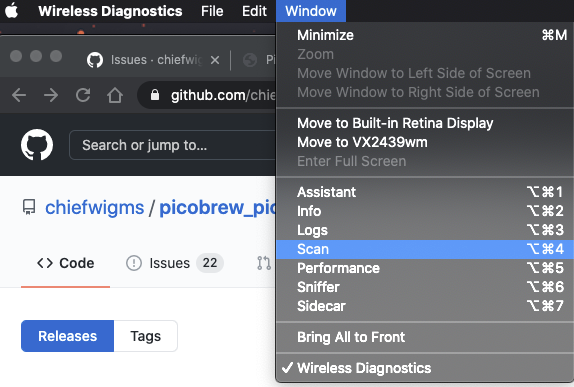
Window > Scan.
Personally I find working with command line tools easier.. build a diagnostic report in the UI takes forever so I prefer to use airport directly and have even setup a suymbolic link for ease of access (was never intended to be a widely used tool... so compatibility may break upon OS updates). While pairing with other command line utility interfaces makes it "super simple" to filter and find the networks that I'm interested (actual BSSIDs are again masked for safety of my home network).
airport -s | tail -n +1 | sed 's/^[[:blank:]]*//;s/[[:blank:]]*$//' | grep -v "SSID" | cut -d ',' -f1,2 | sort -t ',' -k 2 | grep "Pasaana"
Pasaana ma:sk:ed:4s:af:ty -62  11      Y  us WPA2(PSK/AES/AES)
Pasaana sa:fe:ly:ma:sk:ed -72  149     Y  us WPA2(PSK/AES/AES)
In the above you can see there are exactly 2 BSSIDs that are broadcasted for my "Pasaana" network (the second column since I modified the output of airport command to fit my needs programmatically). The first in the list having a stronger signal (right now) than the second due to the sort -t ',' -k 2 (sorting by signal strength). This is what the computer does to select this network given that earlier I showed that the 2.4GHz network broadcasting on channel 11 was selected by the OS. For our RaspberryPi setup I will need this network configured with the BSSID as I choose not to split my 2.4Ghz away from my 5.0Ghz networks.
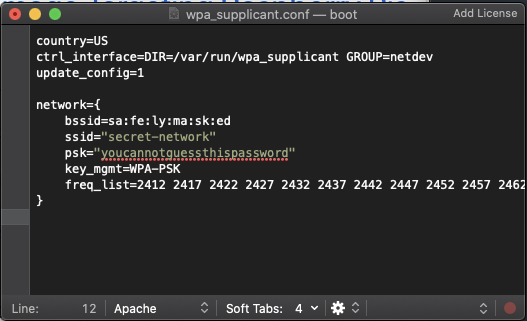
Now you have the BSSID you needed for setting up the WiFi connection for the RaspberryPi we need to make one more modification to the line in the wpa_supplicant.conf file. The diff below (using git syntax) is to show how the leading # (number/pound/hash symbol + space) are removed and the exact string from the BSSID identified above is put in the place of the example.
-   # bssid==YO:UR:24:GH:ZB:SS:ID
+   bssid=sa:fe:ly:ma:sk:ed
Find & Scan Wireless Networks from the Command Line in Mac OS X
Wi-Fi Scanner Tool is Native in Mac OS X, Here’s How to Use it
Step #5: Insert SD into PI & Power on
... yup no additional context here
Step #6: Wait 2 minutes (that's right - no more long waits!)
... yup no additional context here
Step #7: Wait for a hotspot PICOBREW - the password is PICOBREW
This network name and password is changeable via the server's UI (limited to RaspberryPi based setups). You may want to choose to change this password as anyone that logs into this network will have full internet access that can easily be tracked back to you (ie. legal activity, file sharing, etc).
Step #8: Test out the server and pico brew on :)
Other than the two sub-bullets from Github about accessing the UI there isn't much more context there... For connecting your machine just type in the Step #7 network and password when changing their WiFi configuration.
Alternatively, with the addition of an ethernet port on the ZSeries machines you can use this interface to connect the machine to the RaspberryPi if you have either a native ethernet port or a USB->Ethernet adapter. (DO NOT CONNECT YOUR RaspberryPi DIRECTLY TO YOUR HOME NETWORK).
If you connected your RaspberryPi to your home network you should be able to navigate to http://raspberrypi/ (assuming you don't have another device by that name, and your network isn't blocking local name resolutions).
If the above didn't work or you choose not to connect to your home network then simply connect a mobile device (computer, phone, tablet, etc) to the RaspberryPi Wireless Access Point (defaulted as PICOBREW) and navigate to http://picobrew.com like you used to.
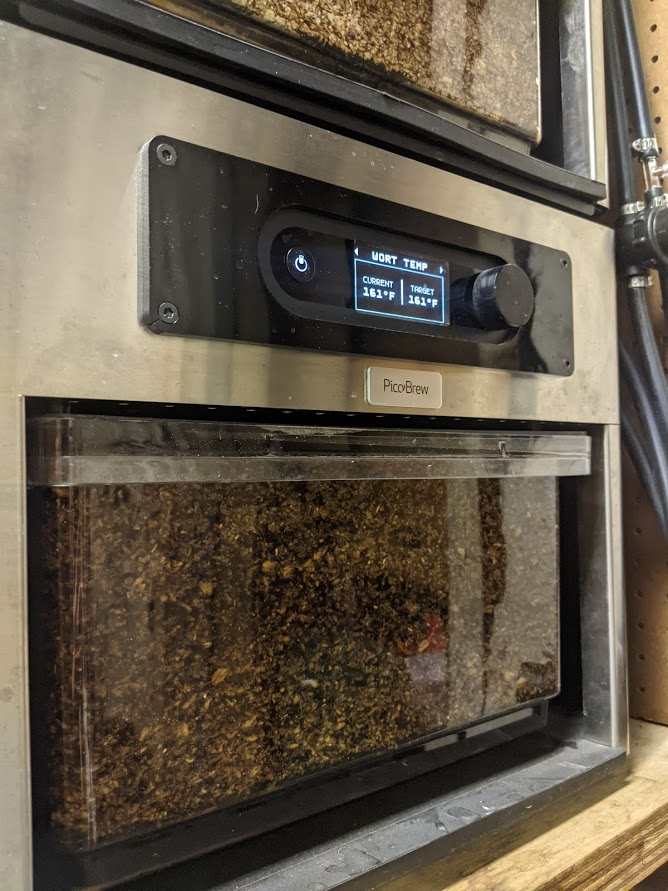
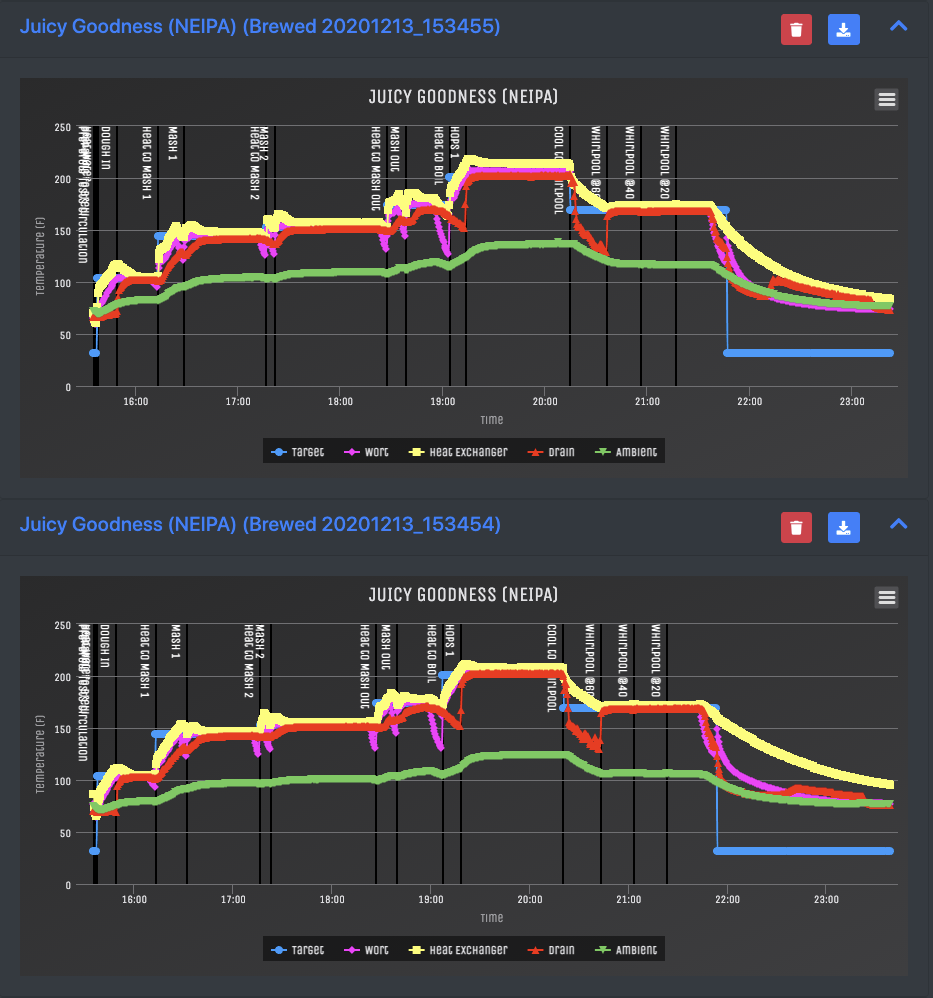
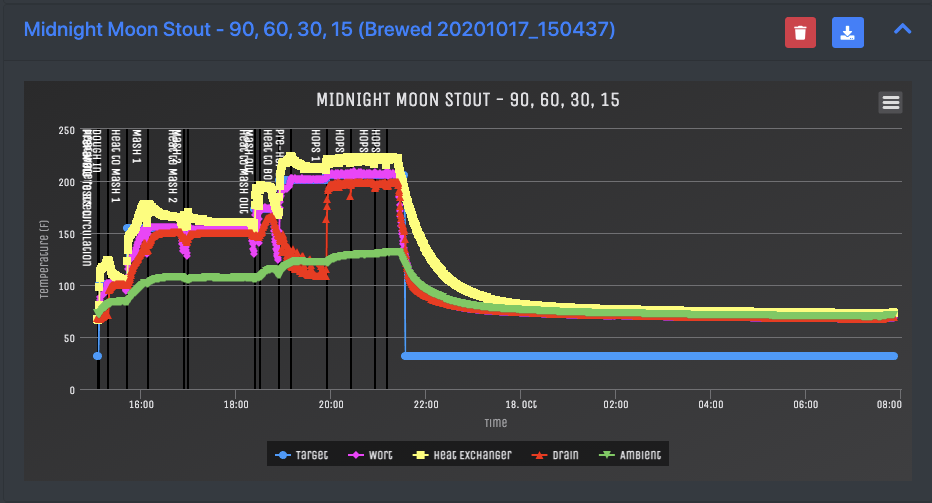
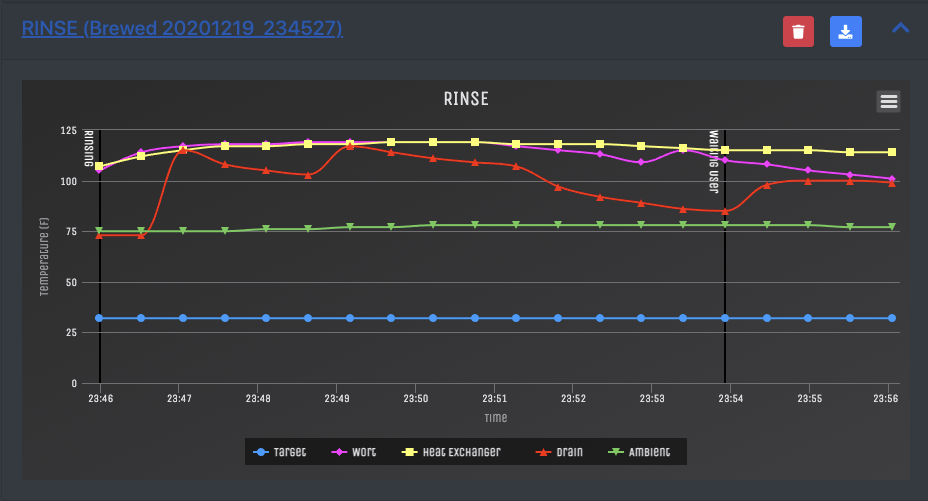
Some Screenshots and Pictures of a Z Making Beer


References
 chiefwigms
 hotzenklotz
 manofthemountain
 Intecpsp
 tmack8001